Navigating the intricacies of 1980s Yamaha gas golf cart repair demands dedicated resources, like factory parts catalogs and detailed engine manuals – specifically for the Doosan GL08K.
Scope of this Repair Manual Guide
This guide comprehensively covers the repair and maintenance of 1980s Yamaha gas-powered golf carts, with a primary focus on the “Sun Classic” models. It delves into detailed procedures for engine diagnostics – centering on the Doosan GL08K – fuel system overhauls, and electrical system troubleshooting.
Furthermore, it provides instructions for brake system repairs, suspension and steering adjustments, and even body/frame work. Utilizing Yamaha G2 parts catalogs is emphasized for accurate component sourcing. This manual doesn’t just offer fixes; it aims to empower owners and technicians with the knowledge to perform effective repairs, extending the life of these classic vehicles. It references resources like the Pierburg 2E2 carburetor repair manuals.
Identifying Your Specific 1980s Yamaha Gas Model (Sun Classic)
Accurate identification is crucial before commencing any repair work on your 1980s Yamaha gas golf cart. While often referred to as the “Sun Classic,” variations existed. Examining the vehicle’s serial number, typically located on the frame near the steering column, is the first step.
Consulting Yamaha G2 parts catalogs, readily available online, allows cross-referencing of serial numbers with specific model years and configurations. Knowing your exact model ensures you obtain the correct replacement parts and follow the appropriate repair procedures. Different engine types, like the Doosan GL08K, require specific maintenance. Proper identification avoids costly mistakes and ensures a successful restoration.

Essential Tools and Safety Precautions
Prioritize safety! Standard tools plus golf cart-specific instruments are needed, alongside protective gear, for effective and secure 1980s Yamaha gas golf cart maintenance.
Required Tools for Common Repairs
Successfully tackling 1980s Yamaha gas golf cart repairs necessitates a well-equipped toolkit. Essential items include a comprehensive socket set (both metric and standard), open-end wrenches, screwdrivers (Phillips and flathead), pliers, and a torque wrench for precise fastener tightening. Diagnostic tools like a multimeter are crucial for electrical system troubleshooting.
Furthermore, specialized tools such as a carburetor cleaning kit (especially for the Pierburg 2E2), compression tester, and valve lapping tool prove invaluable for engine work. A fuel pressure gauge aids in fuel system diagnostics. Don’t forget basic hand tools like hammers, punches, and pry bars. Access to a Yamaha G2 parts catalog will help identify specific fasteners and components, ensuring you have the correct tools for the job.
Safety Gear and Procedures
Prioritizing safety is paramount when repairing 1980s Yamaha gas golf carts. Always wear safety glasses to protect your eyes from debris. Gloves are essential to shield your hands from chemicals and sharp edges. When working with the fuel system, ensure adequate ventilation and avoid open flames.
Disconnect the battery before undertaking any electrical work to prevent shorts and shocks. Utilize jack stands when lifting the cart for undercarriage repairs. Properly dispose of used fluids (oil, fuel, coolant) according to local regulations. A fire extinguisher rated for gasoline fires should be readily accessible. Consult repair manuals for specific safety warnings related to each procedure.

Engine Diagnostics and Repair (Doosan GL08K Focus)
Troubleshooting the Doosan GL08K engine requires a systematic approach, utilizing parts manuals and understanding common issues within these 1980s Yamaha models.
Understanding the Doosan GL08K Engine
The Doosan GL08K engine, prevalent in 1980s Yamaha gas golf carts, is a single-cylinder, four-stroke powerplant demanding specific attention during repair. Accessing a dedicated Doosan GL08K engine parts manual is crucial for identifying components and understanding their function. These engines, while relatively simple, require precise carburetor adjustment – often utilizing a Pierburg 2E2 carburetor – for optimal performance.
Proper diagnostics necessitate understanding the engine’s fuel and ignition systems. Familiarity with the engine’s layout, as depicted in available manuals, aids in efficient troubleshooting. Recognizing common failure points, like worn piston rings or valve issues, is essential. Remember, detailed repair information is often found within factory service documentation and specialized golf cart repair guides.
Common Engine Problems & Troubleshooting
Frequently encountered issues in the 1980s Yamaha gas golf carts with the Doosan GL08K engine include carburetor malfunctions, leading to starting difficulties or poor running. A clogged carburetor, specifically the Pierburg 2E2 model, is a common culprit. Spark plug fouling, often due to rich fuel mixtures, also presents problems. Compression loss, stemming from worn piston rings or valves, diminishes power.
Troubleshooting begins with verifying fuel delivery and spark. Inspect the fuel lines for obstructions and test the ignition system. Utilize a compression tester to assess engine health. Referencing a detailed repair manual aids in pinpointing specific issues and implementing effective solutions. Remember, consistent maintenance prevents many of these problems.
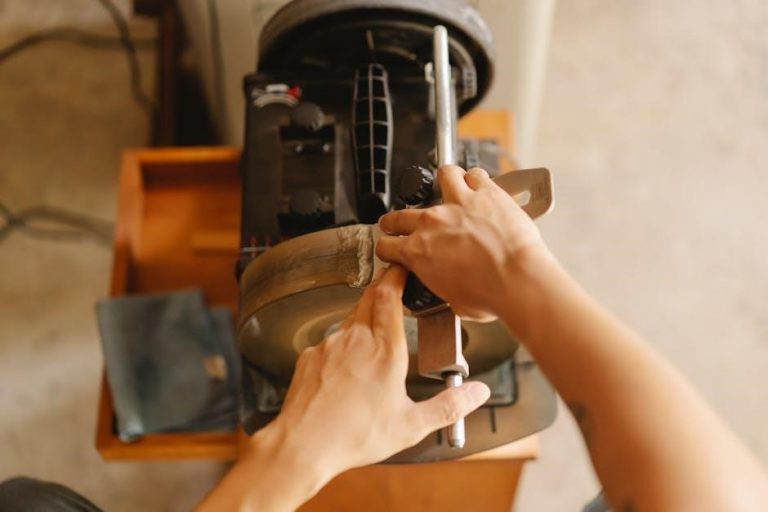
Carburetor Repair & Adjustment (Pierburg 2E2 Carburetor)
The Pierburg 2E2 carburetor, prevalent in 1980s Yamaha gas golf carts, requires meticulous attention during repair. Disassembly demands careful labeling of components for correct reassembly. Thoroughly clean all passages with carburetor cleaner, paying close attention to the jets and emulsion tube. Inspect the float and needle valve for wear or damage, replacing if necessary.
Adjustment involves setting the idle mixture screw and idle speed screw. Begin with the idle mixture screw lightly seated, then adjust for the smoothest idle. Fine-tune the idle speed screw to achieve the desired RPM. A repair manual provides specific settings for optimal performance.

Fuel System Repair
Maintaining a clean fuel system is crucial; inspect the tank, fuel pump, and lines for obstructions or damage, ensuring optimal engine performance.
Fuel Tank Inspection and Cleaning
Thoroughly inspect the fuel tank for any signs of rust, corrosion, or sediment buildup, as these contaminants can severely restrict fuel flow and damage carburetor components. Begin by carefully draining all remaining fuel from the tank, adhering to proper safety protocols for flammable liquids.
Next, visually examine the interior of the tank, using a flashlight to identify any problematic areas. If rust or sediment is present, a cleaning process is essential. A common method involves using a fuel tank cleaner specifically designed for small engines, following the manufacturer’s instructions meticulously.
Alternatively, a mechanical cleaning method using a tank sloshing kit with appropriate solvents can be employed. After cleaning, thoroughly flush the tank with fresh fuel to remove any residual cleaning agents before reinstallation. Ensure all fittings and connections are secure to prevent leaks.
Fuel Pump and Fuel Line Maintenance
Regular maintenance of the fuel pump and fuel lines is crucial for consistent engine performance. Inspect the fuel pump for leaks, cracks, or signs of deterioration. Test its functionality by checking fuel pressure output, comparing it to the manufacturer’s specifications. A weak or failing fuel pump will cause starting and running issues.
Fuel lines should be examined for cracks, kinks, or brittleness. Replace any damaged fuel lines immediately to prevent fuel leaks and potential fire hazards. Ensure all fuel line connections are tight and secure, utilizing appropriate clamps.
Consider periodically replacing the fuel filter, located inline with the fuel line, to prevent debris from reaching the carburetor. Proper fuel system maintenance ensures a clean and reliable fuel supply to the engine.

Electrical System Troubleshooting
Diagnosing electrical faults requires a systematic approach, utilizing wiring diagrams and testing components like the battery and starter generator for optimal function.
Battery Maintenance and Testing
Maintaining the battery is crucial for reliable operation of your 1980s Yamaha gas golf cart. Regular inspection for corrosion around terminals is paramount; clean with a baking soda solution if present. Always ensure connections are tight and secure to prevent voltage drops. Testing the battery’s voltage with a multimeter reveals its state of charge – a fully charged 12-volt battery should read approximately 12.6 volts.
Furthermore, perform a load test to assess the battery’s ability to deliver consistent power under demand. Low readings indicate a failing battery requiring replacement. Proper charging practices, avoiding overcharging or deep discharging, extend battery life significantly. Remember to check electrolyte levels in non-sealed batteries and top off with distilled water as needed.
Starter Generator System Repair
The starter generator is a core component, functioning as both a starter motor and a generator for charging the battery. Troubleshooting often begins with checking the drive belt for wear or breakage; a slipping belt prevents proper engagement. Inspect the generator’s brushes for excessive wear, replacing them if necessary to maintain charging efficiency.
Voltage regulation is critical; a faulty regulator can lead to overcharging or insufficient charging. Utilize a multimeter to verify the output voltage while the engine is running. Wiring connections should be clean and tight. If the starter fails to engage, examine the solenoid and ensure it receives power from the ignition switch. A comprehensive wiring diagram is invaluable for fault finding.
Wiring Diagram Overview & Fault Finding
A detailed wiring diagram is essential for diagnosing electrical issues in these older Yamaha carts. Understanding the system’s layout – including the battery, starter generator, ignition switch, and lights – is paramount. Begin fault finding by visually inspecting all wiring for damage, corrosion, or loose connections.
Utilize a multimeter to test for continuity and voltage at various points in the circuit. Common problems include broken wires, faulty connections, and corroded terminals. Trace the wiring carefully, referencing the diagram to identify each component and its function. Remember to disconnect the battery before performing any electrical work to prevent shorts.
Brake System Repair
Maintaining safe stopping power requires regular inspection of brake pads and cables, alongside adjustments to ensure optimal functionality and reliable performance.
Brake Pad Inspection and Replacement
Regularly inspecting your 1980s Yamaha gas golf cart’s brake pads is crucial for safety. Begin by visually assessing the pad material for wear; look for thinning or damage. Measure the remaining friction material – if it’s below a specified minimum thickness (consult a parts catalog), replacement is necessary.
Removing the old pads typically involves disconnecting the brake cable and disassembling the brake caliper. Clean the caliper thoroughly before installing new pads, ensuring proper lubrication of moving parts. When fitting new pads, verify correct alignment and secure them firmly. After reassembly, test the brakes thoroughly in a safe area, confirming proper operation and responsiveness before resuming normal use.
Brake Cable Adjustment and Repair
Maintaining proper brake cable tension is vital for effective stopping power in your 1980s Yamaha gas golf cart. Begin by inspecting the cable for fraying, kinks, or corrosion. Adjust the cable tension using the adjustment mechanism, ensuring the brakes engage firmly but don’t drag when released.
If the cable is damaged, replacement is recommended. Disconnect the old cable from both the brake lever and the caliper, then route the new cable identically. Securely fasten the cable ends and adjust the tension. Always verify proper brake function after any cable work, testing thoroughly in a controlled environment before operation.

Suspension and Steering Repair
Addressing worn shock absorbers and steering components restores safe handling; inspect for damage and ensure proper alignment for optimal performance and stability.
Shock Absorber Replacement
Replacing worn shock absorbers is crucial for maintaining a comfortable ride and safe handling in your 1980s Yamaha gas golf cart. Begin by safely supporting the vehicle’s frame using jack stands. Disconnect the existing shock absorbers, noting the orientation of any washers or bushings.
Carefully remove the old shocks and clean the mounting surfaces. Install the new shock absorbers, ensuring correct alignment and tightening the mounting hardware to the manufacturer’s specified torque. Double-check all connections for security. A proper shock absorber replacement significantly improves stability and reduces stress on the frame, enhancing the overall driving experience and preventing further damage.
Steering System Inspection and Adjustment
A thorough inspection of the steering system is vital for safe operation. Begin by checking for excessive play in the steering wheel and tie rod ends. Inspect the steering linkage for wear, damage, or loose connections. Adjust the steering box, if applicable, to minimize free play, following the factory specifications detailed in repair manuals.
Lubricate all steering components to ensure smooth operation. Verify proper alignment of the front wheels; misalignment can cause uneven tire wear and handling issues. Tighten any loose fasteners and replace worn parts immediately. Regular inspection and adjustment maintain responsive steering and prevent potential accidents.

Parts Catalogs and Resources (Yamaha G2 Focus)
Locating original Yamaha G2 parts catalogs is crucial; these provide exploded diagrams and part numbers for accurate repairs and restoration efforts.
Utilizing Yamaha G2 Parts Catalogs
Effectively employing Yamaha G2 parts catalogs streamlines the repair process significantly. These catalogs, often available in PDF format, detail every component of your 1980s gas golf cart, including the engine – frequently a Doosan GL08K. Understanding the catalog’s organization is key; parts are typically grouped by assembly, such as the fuel system, electrical components, or the chassis.
Each part is assigned a unique number, essential for accurate ordering. Cross-referencing these numbers with suppliers ensures you receive the correct replacement. Catalogs also illustrate exploded views, visually demonstrating how parts fit together, aiding in reassembly. Remember to verify the catalog’s applicability to your specific Sun Classic model year, as variations exist. Proper catalog use minimizes errors and maximizes repair efficiency.
Sourcing Replacement Parts
Locating replacement parts for a 1980s Yamaha gas golf cart requires a multi-faceted approach. While Yamaha dealerships remain an option, availability for older models can be limited. Online retailers specializing in golf cart parts offer a broader selection, often including both new and used components. Be prepared to provide your cart’s model number and, crucially, the part number from the Yamaha G2 parts catalog.
Consider exploring golf cart forums and online communities; enthusiasts frequently share sourcing tips and may have spare parts available. When purchasing, prioritize reputable suppliers to ensure quality and avoid counterfeit parts. Don’t overlook the possibility of rebuilding or refurbishing existing components, potentially saving costs.
Transmission and Drive System Repair
Addressing clutch issues and differential concerns is vital; proper maintenance and adjustment, guided by repair manuals, ensure smooth operation and longevity.
Clutch Maintenance and Adjustment
Maintaining the clutch system on your 1980s Yamaha gas golf cart is crucial for optimal performance. Regular inspection for wear and tear on the clutch shoes, springs, and drum is essential. A worn clutch will result in slipping, reduced acceleration, and potential transmission damage. Adjustment typically involves ensuring proper spring tension and clearance between the clutch shoes and drum.
Consulting a dedicated repair manual, specifically those referencing the Yamaha G2 models, will provide detailed diagrams and torque specifications. Incorrect adjustments can lead to premature wear or clutch failure. Pay close attention to the drive chain tension as well, as it directly impacts clutch operation. Proper lubrication of all moving parts is also paramount for smooth engagement and disengagement.
Differential Inspection and Repair
The differential in your 1980s Yamaha gas golf cart allows the rear wheels to rotate at different speeds during turns, preventing tire scrubbing and ensuring smooth handling. Regular inspection involves checking the differential oil for contamination and proper level. Look for signs of leaks around the differential housing and axle seals. Repair often entails replacing worn bearings, gears, or seals.
A factory service manual, particularly those for the Yamaha G2, is invaluable for disassembly and reassembly procedures. Proper gear mesh and preload are critical for quiet operation and longevity. Ignoring differential issues can lead to noisy operation, reduced traction, and ultimately, differential failure. Always use the specified lubricants and torque specifications during reassembly.

Body and Frame Repair
Addressing frame damage and body panel issues requires careful assessment; manuals detail identifying damage and restoration techniques for these classic Yamaha golf carts.
Identifying and Repairing Frame Damage
Thorough inspection is crucial when addressing frame damage on a 1980s Yamaha gas golf cart. Look for bends, cracks, or signs of previous welding, particularly around suspension mounting points and the steering column. Rust is a common issue, weakening the frame’s structural integrity. Repair manuals often don’t detail extensive fabrication, but guidance on patching smaller areas may exist.
Minor bends can sometimes be carefully straightened, but severely damaged frames may necessitate professional welding or, in extreme cases, replacement. Prioritize safety; a compromised frame impacts handling and overall vehicle stability. Always consult a qualified welder for structural repairs, ensuring they use appropriate materials and techniques. Document any repairs thoroughly for future reference and potential resale value.
Body Panel Replacement and Restoration
Restoring the body of a 1980s Yamaha gas golf cart often involves replacing or repairing panels. Finding original parts can be challenging; aftermarket options or sourcing used panels from salvage yards are common solutions. Repair manuals may not offer detailed bodywork instructions, but general fiberglass or plastic repair techniques apply. Assess the damage – minor cracks can be patched, while severe damage usually requires panel replacement.
When replacing panels, ensure proper alignment and secure fastening. Consider repainting to match the original color or customize the cart’s appearance. Documentation of the restoration process enhances the vehicle’s value. Careful preparation and attention to detail are key to achieving a professional finish.